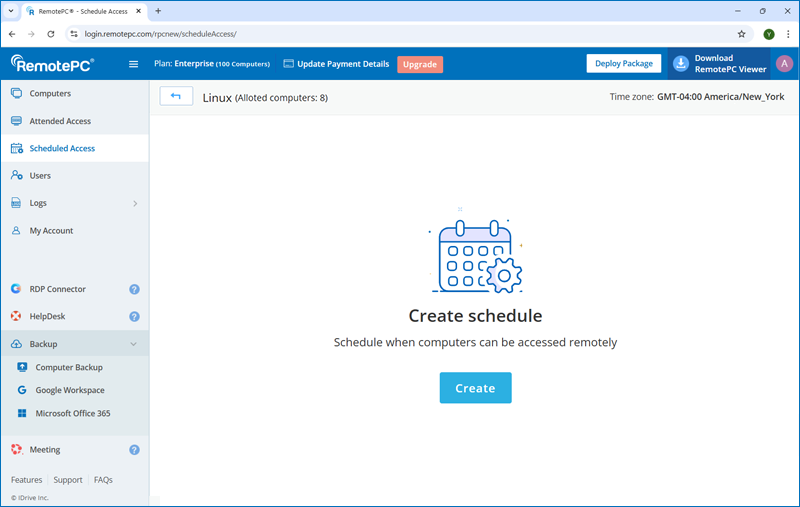
RemotePC scheduled access |
|
|
If your question is not addressed below, please contact us through our support form and we'll get back to you shortly. | |
| What is RemotePC scheduled access? | |
| How is scheduling a remote access beneficial? | |
| What are connection pools for schedules? | |
| How do I create resources? | |
| Can I edit a resource? | |
| How do I delete a resource? | |
| Can I set a timezone that applies to all remote access schedules? | |
| How do I schedule computers for remote access? | |
| Can I edit a remote access schedule? | |
| Can I clone a remote access schedule? | |
| Is it possible to pause a remote access schedule? | |
| How do I delete a remote access schedule? | |
| How do I view a schedule in calendar layout? | |
RemotePC scheduled access enables admins to schedule remote access for employees, IT support, customer service, help desk technicians, or educational institutions to on-site computers at predetermined time slots. This feature ensures that users can connect to an available computer during their scheduled time, without manual searching or timing overlaps between users.
Note:
- Scheduled remote access is available only for RemotePC Enterprise plans.
- Only account owners and administrators can create, edit, or manage resources, add computers to resources, and set or edit schedules for user access. As administrators already have full access to all computers, they do not require scheduled access to connect.
- Group administrators can create and modify resources and schedules, and also view and connect to computers assigned to them for scheduled access.
- Users can only view and connect to the computers assigned to them for scheduled access, but cannot create or manage resources or schedules.
The scheduled access feature in RemotePC offers Enterprise admins the following benefits:
- Allows control over the user's remote sessions - Admins can set or schedule specific time frames for different users to access computers remotely.
- Access to computers is granted only during scheduled periods - By configuring remote access permissions for individual computers or groups, admins can restrict user connections to specific time slots. The computer will automatically terminate remote sessions outside these specified periods.
- Manage remote access by creating resources to schedule computers - Admins can create resources, add computers, assign users or groups, and schedule access to prevent time frame overlaps.
Connection pools consist of a set of active computers ready for remote access.
- Flexible access to the assigned computers via connection pool - Users can connect directly to a specific computer or use the connection pool's 'Connect' button to automatically access any available computer from the assigned list.
- Optimized multi-user access through shared computer pools - This setup enables multiple users to access a shared pool of computers simultaneously while preventing conflicts or overlaps in available connections.
To create a resource,
- Login to RemotePC via web browser.
- Click 'Scheduled Access'.
- Click 'Create Resources'.
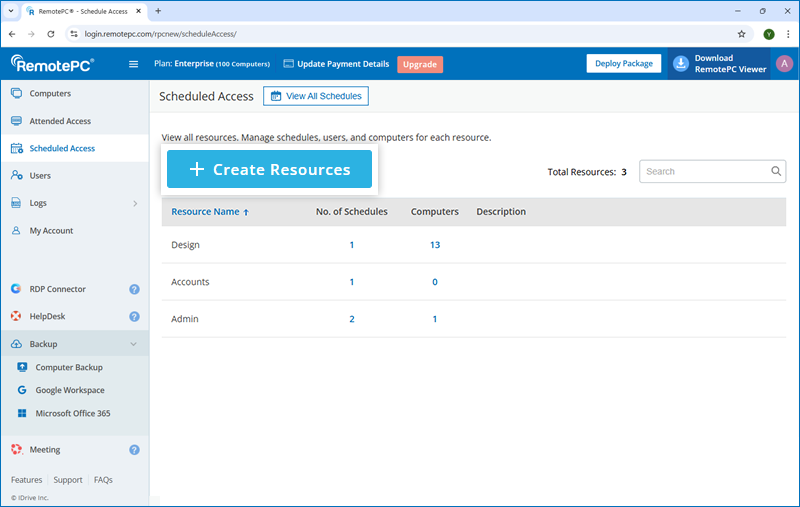
- Enter a name and description for the resource.
- Select a group admin from the 'Assign group admin' dropdown list.
- Click the dropdown next to 'Advanced settings' and choose the preferred options:
Advanced Settings
- Support connection pool for schedules - Enable this to let users automatically connect to any available computer from their assigned list using connection pool. When enabled, select 'Set the schedule as connection pool' option under default settings to apply the schedule to the entire pool.
- Support exclusive (remote or local) access for user account - Enable this to activate the default schedule settings below. When enabled, select options to secure the assigned computers in the resource and their scheduled sessions against unauthorized use.
Default settings for schedules
Select your preferred options below to configure the settings:
- Set the schedule as connection pool - Allow users to access any available computer from their assigned pool at scheduled time slots and manage connections within the pool.
- Prevent users from accessing computers that are already in use - Block users from trying to access computers that are currently being used.
- Allow access if the computer is idle for more than <X> minutes - Grant access to a computer if it has been idle for more than a set amount of time.
- Blank screen and disable input devices during session - Show a blank screen and disable input devices (keyboard and mouse) during a session to prevent interaction or visibility of the session's contents.
- Log out user when remote session ends - Automatically sign out a user when their remote session is over.
- Lock computer screen before user is logged out of remote session for unintentional disconnection - Lock the computer screen before logging out the user from a remote session to protect it from unauthorized access in case of an unintentional disconnection.
Note: To apply these settings, make sure that the remote computers have the following version of the RemotePC application installed:
Windows (7.6.91) | Mac (7.7.38) | Linux (5.10.2) or later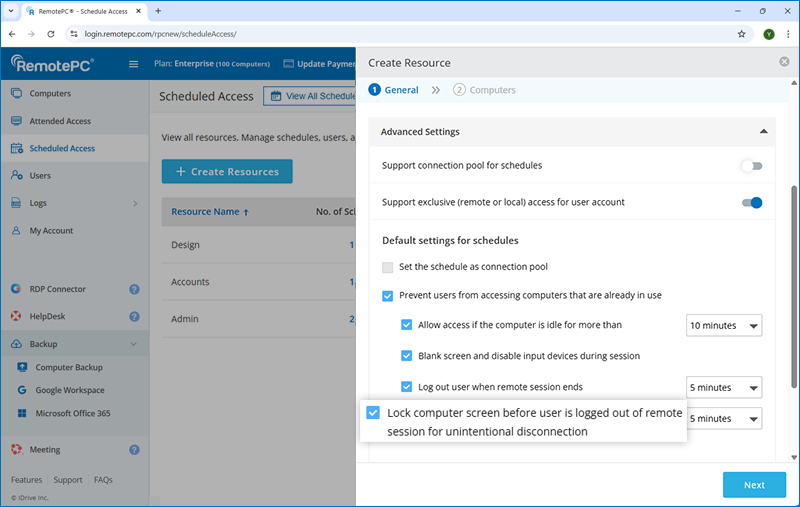
- Click 'Next'.
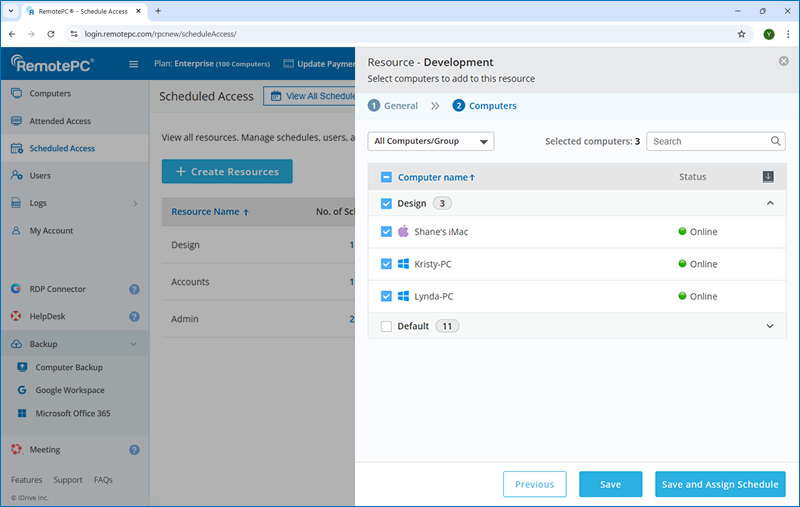
- Under 'Computers', select 'All Computers/Groups' or a specific group from the dropdown list to view the available computers. You can then select all or specific computers from the chosen groups.
Note: New computers added later to the selected groups will not be automatically included in the resource. Only the computers available at the time of resource creation are assigned.
- Click 'Save' to save the resource.
Alternatively, click 'Save and Assign Schedule' to save the resource and open the schedule creation page simultaneously. Refer to this FAQ to create a schedule for remote access.
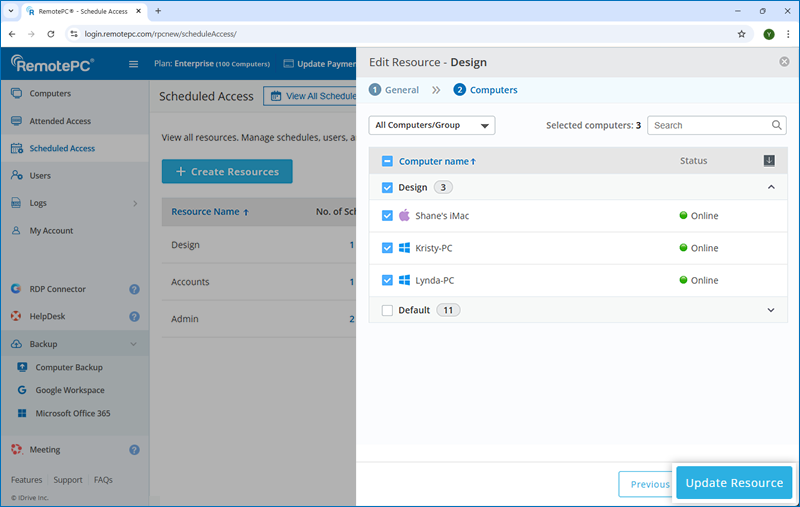
To edit a resource:
- Login to RemotePC via web browser.
- Click 'Scheduled Access'.
- Hover over the resource you want to edit and click
 .
.
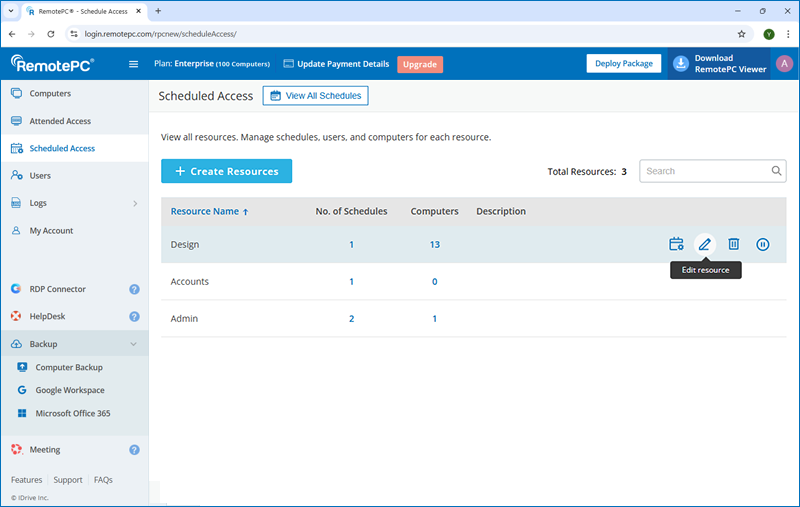
The edit resource screen will appear.
- Modify the details as required.
- Click 'Update Resource' to save changes.
To delete a resource:
- Login to RemotePC via web browser.
- Click 'Scheduled Access'.
- Hover over the resource you want to delete and click
 .
.
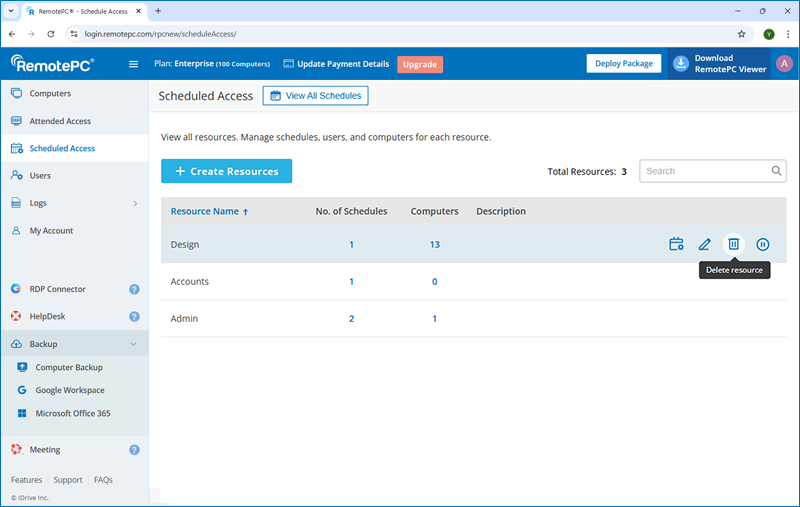
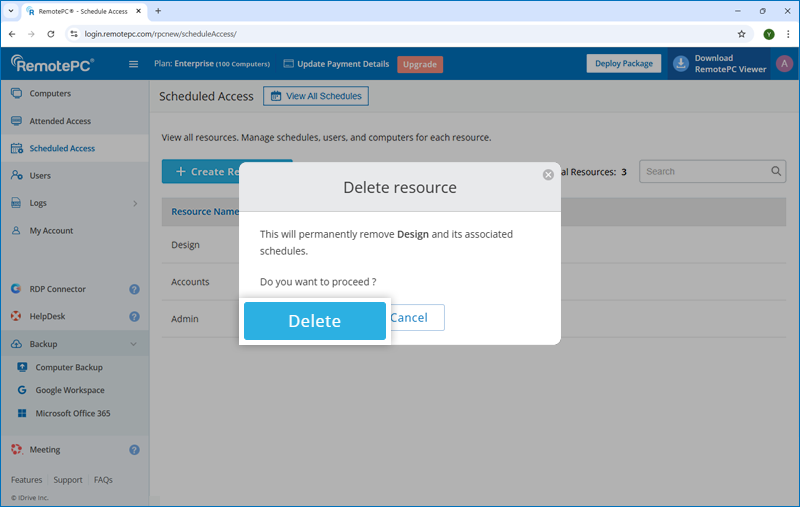
- Click 'Delete' in the confirmation popup.
Note: Deleting a resource will also delete the associated schedules.
Yes, you can select a timezone that applies to all scheduled remote access schedules.
To set a timezone,
- Log in to RemotePC via a web browser.
- Go to 'My Account'.
- Go to 'Settings' and navigate to 'Scheduled Access'.
- Select your preferred option under 'Timezone'.
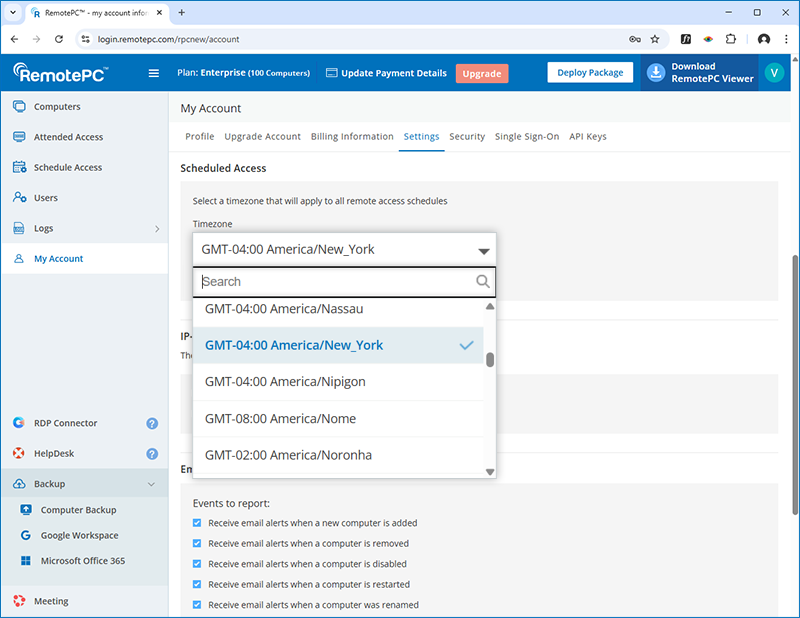
- Click 'Save Changes'.

Note:
- When a new account is created, by default the local machine's time zone is set as the timezone for scheduled access.
- Set the time zone before creating any schedules. Once schedules are created, the time zone cannot be changed unless all existing schedules are deleted.
- Only administrators will be able to modify the time zone. The timezone will be applicable only for Scheduled remote access.
Before creating a scheduled remote access session, you must select a time zone. This time zone will apply to all scheduled sessions and cannot be changed unless all existing schedules are deleted. Refer to this FAQ to set a time zone for all scheduled sessions.
To schedule computers for remote access,
- Login to RemotePC via web browser.
- Click 'Scheduled Access'
- Hover over the resource you want to schedule for remote access and click
 .
. - Click 'Create' to create a schedule.
- Enter a name and description for the schedule.
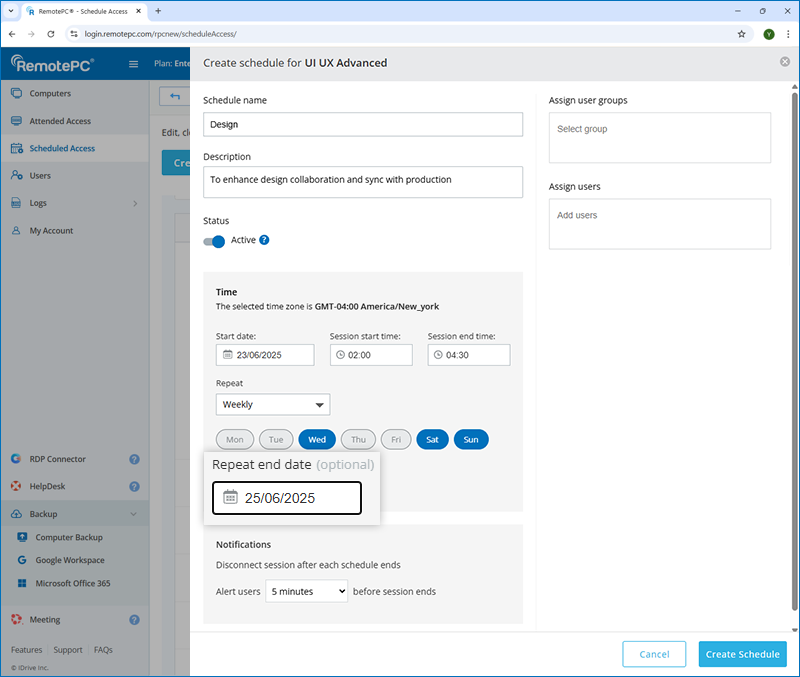
- Set the following schedule parameters:
- Start date - Specify when access to the selected computers should begin.
- Session start time - Set the time when the remote session should start.
- Session end time - Select the time when the remote session should end.
- Repeat - Choose the frequency at which the schedule should repeat.
- Never - By default, the schedule will not repeat.
- Daily - Run the schedule every day at the specified time.
- Weekly - Run the schedule throughout the week at the selected time.
- Repeat end date (Optional) - Set the date when the schedule should stop repeating. This option is available only when 'Daily' or 'Weekly' is selected.
- Disconnect session after each schedule ends - Get notified before your scheduled session ends and automatically disconnect the session once the schedule is over.
- Alert users <X> minutes before session ends - RemotePC will notify the users at the selected time before the session ends.
- Select a user group to assign to this schedule for remote access.
- Select individual users to assign to this schedule for remote access.
- Click 'Create Schedule'.
The schedule will be saved and appear in the list of scheduled access. Users can view all upcoming and active schedules from the 'View all schedules' section.
Note: When creating a schedule, it is set to 'Active' by default. Toggle the switch to 'Inactive' if you do not wish to activate the schedule immediately.
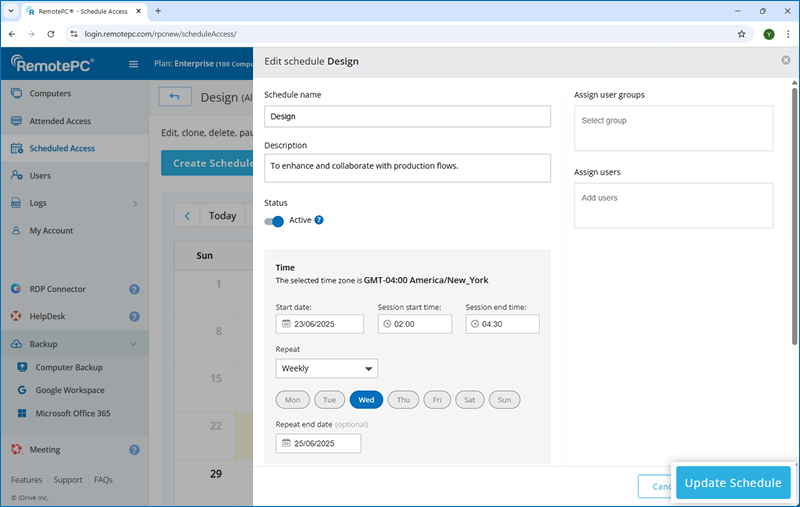
To edit a schedule for remote access,
- Login to RemotePC via web browser.
- Click 'Scheduled Access'.
- Click 'Manage Schedule' next to the resource whose schedule you want to edit.
- Click the schedule you want to edit, and then click
 . The edit schedule screen will appear.

- Modify the details as required.
- Click 'Update Schedule' to save changes.
Yes, you can create a clone of a remote access schedule.
To clone a schedule,
- Login to RemotePC via web browser.
- Click 'Scheduled Access'.
- Click 'Manage Schedule' next to the resource whose schedule you want to clone.
- Click the schedule you want to clone and click
 . The schedule details will be copied.
- Make required changes to the schedule details.
- Click 'Clone Schedule'.
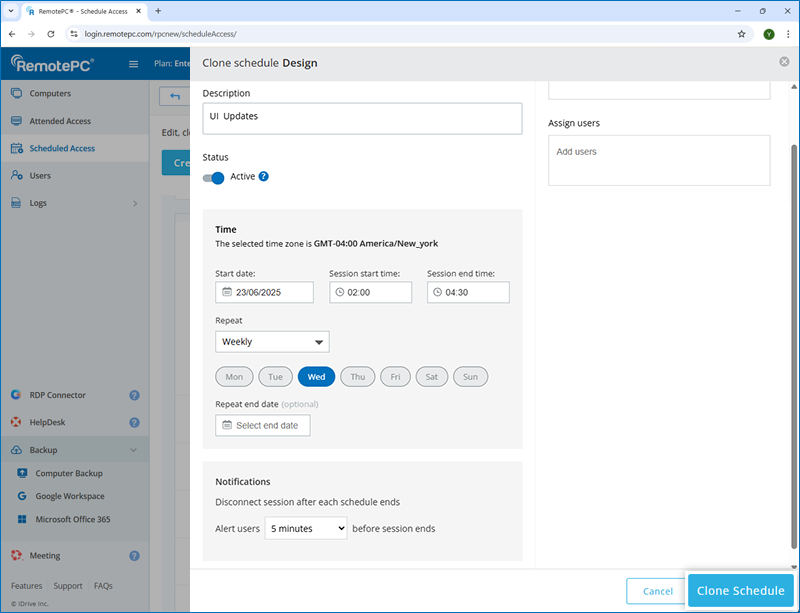
The new schedule will be saved and appear in the list of scheduled access.
Yes, you can pause a scheduled remote access session.
To pause a scheduled remote access session,
- Login to RemotePC via web browser.
- Click 'Scheduled Access'.
- Click the 'View all schedules' button.
- Click the schedule you want to pause and click
 .
. - Click 'Pause' in the confirmation popup.
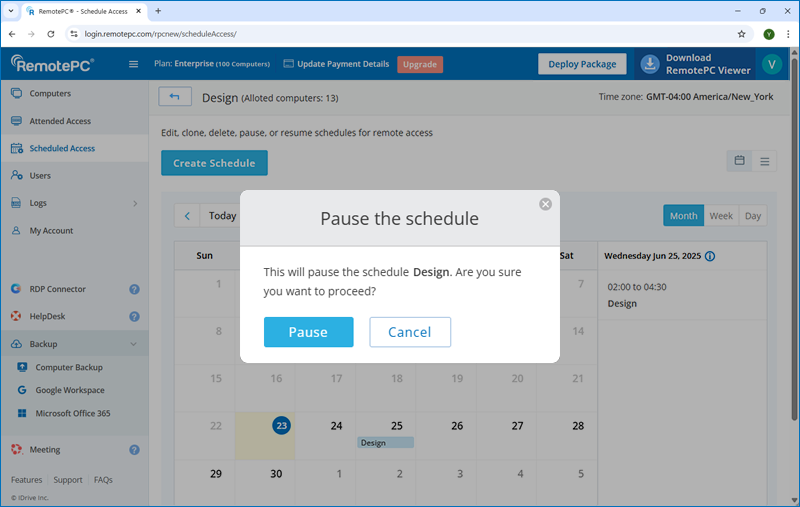
Alternatively, go to 'Manage Schedule' next to the associated resource to pause a schedule.
The remote session schedule will be paused, and users will not be able to access or initiate the session. To unpause and resume the schedule, click  .
.
To delete a schedule for remote access,
- Login to RemotePC via web browser.
- Click 'Scheduled Access'.
- Click the 'View all schedules' button.
- Click the schedule you want to delete and click .
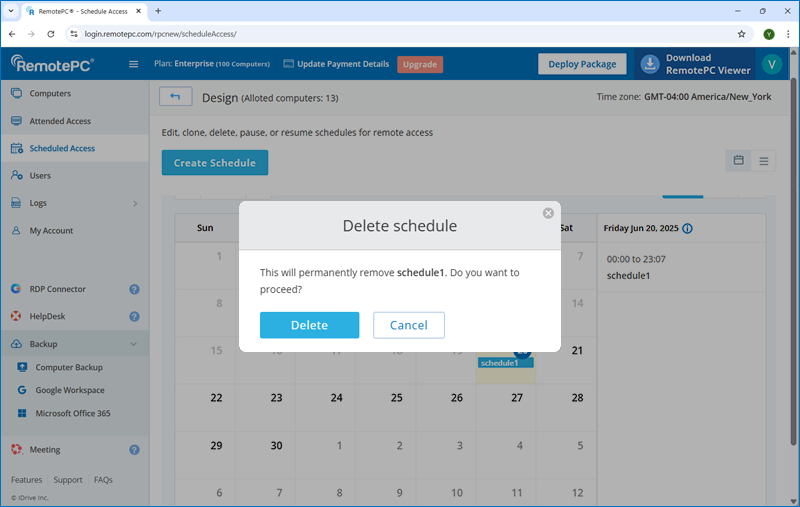
- Click 'Delete' in the confirmation popup.
Alternatively, go to 'Manage Schedule' next to the associated resource to delete a schedule.
The schedule will be removed from your account.
To view a schedule in a calendar layout,
- Login to RemotePC via web browser.
- Click 'Scheduled Access'.
- Click the 'View all schedules' button.
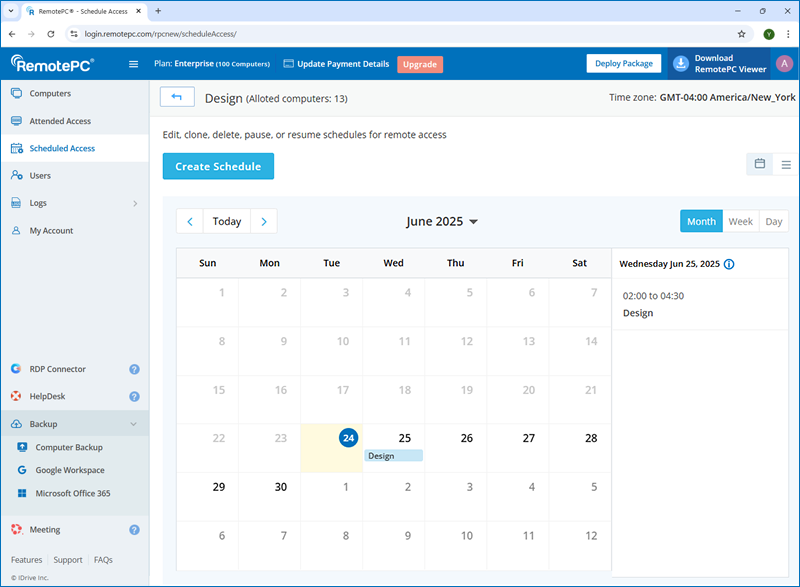
All dates with configured schedules will be displayed in calendar view. Click any highlighted date to view the scheduled remote session details, including the date, time, frequency, preferences, assigned groups and users, and the group administrator.
The schedules can be paused or deleted. To view schedules for the previous ![]() and next
and next ![]() month click the respective icons.
month click the respective icons.
Alternatively, click ![]() to switch from calendar view to list view.
to switch from calendar view to list view.
Note: Only account owners and administrators can delete or pause schedules.